手把手教你把 SafeLine 落地到云原生环境
Published 3 years ago
Published 3 years ago

jangrui
Updated 3 years ago
0
反馈内容
手把手教你把 SafeLine 落地到云原生环境
核心一览
SealOS 一键构建 k8s 环境
环境信息
| IP | 主机名 | 操作系统 | 功能作用 | 数据盘 |
|---|---|---|---|---|
| 192.168.20.253 | / | / | lb | |
| 192.168.20.101 | silkdo-1 | Anolis 8.8 | master+longhorn | /dev/vdc |
| 192.168.20.102 | silkdo-2 | Anolis 8.8 | master+longhorn | /dev/vdc |
| 192.168.20.103 | silkdo-3 | Anolis 8.8 | master+longhorn | /dev/vdc |
| 192.168.20.104 | silkdo-4 | Anolis 8.8 | worker | |
| 192.168.20.105 | silkdo-5 | Anolis 8.8 | worker | |
| 192.168.20.106 | silkdo-6 | Anolis 8.8 | worker | |
| 192.168.20.107 | silkdo-7 | Anolis 8.8 | worker | |
| 192.168.20.108 | silkdo-8 | Anolis 8.8 | worker | |
| 192.168.20.109 | silkdo-8 | Anolis 8.8 | worker |
安装 Sealos
1sudo cat > /etc/yum.repos.d/labring.repo << EOF
2[fury]
3name=labring Yum Repo
4baseurl=https://yum.fury.io/labring/
5enabled=1
6gpgcheck=0
7EOF
8sudo yum clean all
9sudo yum install -y sealos
配置clusterfile
1sealos gen \
2  --masters 192.168.20.101,192.168.20.102,192.168.20.103 \
3  --nodes 192.168.20.104,192.168.20.105,192.168.20.106,192.168.20.107,192.168.20.108,192.168.20.109 \
4  --pk ~/.ssh/id_rsa \
5  labring/kubernetes:v1.25.11 \
6  labring/nerdctl:v1.2.1 \
7  labring/helm:v3.12.0 \
8  labring/cilium:v1.13.0
9  > clusterfile
10
11# 替换国内镜像源
12sed -i '/^ImageRepository/ s|""|"registry.aliyuncs.com/google_containers"|' clusterfile
配置负载均衡
我这里的云平台提供 LB 服务,但我又不想让 SVC 使用 LoadBalancer,所以,我这里只配置了 80、443、6443 三个端口,其中 80、443 是给 Ingress Nginx 准备的,6443 是给 APIServer 做负载用的。
另外,如果你需要在集群外访问 APIServer,则需要把负载 IP 也添加到 CertSANs 列表中。
1# CertSANs 添加 lb/vip
2sed -i '/^  CertSANs/a\  - 192.168.20.253' clusterfile
自定义 CIDR
如上,我这里计划用 Cilium 作为 CNI 插件,看 clusterfile 配置可以知道 Sealos 部署的 k8s 集群,默认 PodSubnet 是 100.64.0.0/10,而 Cilium 对应的 clusterPoolIPv4PodCIDR 默认为 10.0.0.0/8,所以,我们需要自定义 cilium Operator 的 clusterPoolIPv4PodCIDR 也为 100.64.0.0/10。
1cat > Kubefile <<EOF
2FROM labring/cilium:v1.13.0
3
4CMD ["cp opt/cilium /usr/bin/","cp opt/hubble /usr/bin/","cilium install --chart-directory charts/cilium --helm-set kubeProxyReplacement=strict,k8sServiceHost=apiserver.cluster.local,k8sServicePort=6443,ipam.operator.clusterPoolIPv4PodCIDR=100.64.0.0/10"]
5EOF
6
7sealos build -t labring/cilium:v1.13.0-amd64 --platform linux/amd64 -f Kubefile .
安装 Kubernetes 集群
1# 部署 Kubernetes
2sealos apply -f clusterfile
至此,我们姑且认为您已经按照上述步骤完成 k8s 集群的安装。
部署 LongHorn 云原生分布式存储
磁盘挂载
如上,我这里规划三个 master 节点作为存储节点,并且磁盘都是 /dev/vdc
1DISK=vdc
2for i in `seq 1 3`;do cat <<-EOF | ssh 192.168.20.10$i;done
3    echo "=========="
4    hostname
5    parted -s /dev/${DISK} mklabel gpt
6    parted -s /dev/${DISK} mkpart p ext4 0 100%
7    mkfs.ext4 -F /dev/${DISK}1
8    sed -i '/longhorn/d' /etc/fstab
9    echo "/dev/${DISK}1 /var/lib/longhorn ext4 defaults 0 0" >> /etc/fstab
10    mkdir /var/lib/longhorn
11    mount -a
12    df -h /var/lib/longhorn
13EOF
安装依赖
安装 iSCSI
1cat <<-'EOF' | kubectl apply -f -
2apiVersion: apps/v1
3kind: DaemonSet
4metadata:
5  name: longhorn-iscsi-installation
6  # namespace: longhorn-system
7  labels:
8    app: longhorn-iscsi-installation
9  annotations:
10    command: &cmd OS=$(grep "ID_LIKE" /etc/os-release | cut -d '=' -f 2); if [[ "${OS}" == *"debian"* ]]; then sudo apt-get update -q -y && sudo apt-get install -q -y open-iscsi && sudo systemctl -q enable iscsid && sudo systemctl start iscsid; elif [[ "${OS}" == *"suse"* ]]; then sudo zypper --gpg-auto-import-keys -q refresh && sudo zypper --gpg-auto-import-keys -q install -y open-iscsi && sudo systemctl -q enable iscsid && sudo systemctl start iscsid; else sudo yum makecache -q -y && sudo yum --setopt=tsflags=noscripts install -q -y iscsi-initiator-utils && echo "InitiatorName=$(/sbin/iscsi-iname)" > /etc/iscsi/initiatorname.iscsi && sudo systemctl -q enable iscsid && sudo systemctl start iscsid; fi && if [ $? -eq 0 ]; then echo "iscsi install successfully"; else echo "iscsi install failed error code $?"; fi
11spec:
12  selector:
13    matchLabels:
14      app: longhorn-iscsi-installation
15  template:
16    metadata:
17      labels:
18        app: longhorn-iscsi-installation
19    spec:
20      tolerations:
21      - key: node-role.kubernetes.io/control-plane
22        operator: Exists
23        effect: NoSchedule
24      - key: node-role.kubernetes.io/master
25        operator: Exists
26        effect: NoSchedule
27      hostNetwork: true
28      hostPID: true
29      initContainers:
30      - name: iscsi-installation
31        command:
32          - nsenter
33          - --mount=/proc/1/ns/mnt
34          - --
35          - bash
36          - -c
37          - *cmd
38        image: hub.silkdo.com/library/alpine:3.12
39        securityContext:
40          privileged: true
41      containers:
42      - name: sleep
43        image: registry.cn-beijing.aliyuncs.com/kubesphereio/pause:3.5
44  updateStrategy:
45    type: RollingUpdate
46EOF
安装 NFSv4 客户端
1cat <<-'EOF' | kubectl apply -f -
2apiVersion: apps/v1
3kind: DaemonSet
4metadata:
5  name: longhorn-nfs-installation
6  # namespace: longhorn-system
7  labels:
8    app: longhorn-nfs-installation
9  annotations:
10    command: &cmd OS=$(grep "ID_LIKE" /etc/os-release | cut -d '=' -f 2); if [[ "${OS}" == *"debian"* ]]; then sudo apt-get update -q -y && sudo apt-get install -q -y nfs-common; elif [[ "${OS}" == *"suse"* ]]; then sudo zypper --gpg-auto-import-keys -q refresh && sudo zypper --gpg-auto-import-keys -q install -y nfs-client; else sudo yum makecache -q -y && sudo yum --setopt=tsflags=noscripts install -q -y nfs-utils; fi && if [ $? -eq 0 ]; then echo "nfs install successfully"; else echo "nfs install failed error code $?"; fi
11spec:
12  selector:
13    matchLabels:
14      app: longhorn-nfs-installation
15  template:
16    metadata:
17      labels:
18        app: longhorn-nfs-installation
19    spec:
20      tolerations:
21      - key: node-role.kubernetes.io/control-plane
22        operator: Exists
23        effect: NoSchedule
24      - key: node-role.kubernetes.io/master
25        operator: Exists
26        effect: NoSchedule
27      hostNetwork: true
28      hostPID: true
29      initContainers:
30      - name: nfs-installation
31        command:
32          - nsenter
33          - --mount=/proc/1/ns/mnt
34          - --
35          - bash
36          - -c
37          - *cmd
38        image: hub.silkdo.com/library/alpine:3.12
39        securityContext:
40          privileged: true
41      containers:
42      - name: sleep
43        image: registry.cn-beijing.aliyuncs.com/kubesphereio/pause:3.5
44  updateStrategy:
45    type: RollingUpdate
46EOF
添加标签
1kubectl label nodes silkdo-1 node.longhorn.io/create-default-disk=true
2kubectl label nodes silkdo-2 node.longhorn.io/create-default-disk=true
3kubectl label nodes silkdo-3 node.longhorn.io/create-default-disk=true
部署 LongHorn
1helm repo add longhorn https://charts.longhorn.io && helm repo update longhorn
2
3
4cat <<-'EOF' | helm -n longhorn-system upgrade -i longhorn longhorn/longhorn --version v1.4.3 --create-namespace -f -
5image:
6  longhorn:
7    engine:
8      repository: uhub.service.ucloud.cn/silkdo/longhornio/longhorn-engine
9    manager:
10      repository: uhub.service.ucloud.cn/silkdo/longhornio/longhorn-manager
11    ui:
12      repository: uhub.service.ucloud.cn/silkdo/longhornio/longhorn-ui
13    instanceManager:
14      repository: uhub.service.ucloud.cn/silkdo/longhornio/longhorn-instance-manager
15    shareManager:
16      repository: uhub.service.ucloud.cn/silkdo/longhornio/longhorn-share-manager
17    backingImageManager:
18      repository: uhub.service.ucloud.cn/silkdo/longhornio/backing-image-manager
19    supportBundleKit:
20      repository: uhub.service.ucloud.cn/silkdo/longhornio/support-bundle-kit
21  csi:
22    attacher:
23      repository: uhub.service.ucloud.cn/silkdo/longhornio/csi-attacher
24    provisioner:
25      repository: uhub.service.ucloud.cn/silkdo/longhornio/csi-provisioner
26    nodeDriverRegistrar:
27      repository: uhub.service.ucloud.cn/silkdo/longhornio/csi-node-driver-registrar
28    resizer:
29      repository: uhub.service.ucloud.cn/silkdo/longhornio/csi-resizer
30    snapshotter:
31      repository: uhub.service.ucloud.cn/silkdo/longhornio/csi-snapshotter
32    livenessProbe:
33      repository: uhub.service.ucloud.cn/silkdo/longhornio/livenessprobe
34
35service:
36  ui:
37    type: NodePort
38    nodePort: 30890
39
40defaultSettings:
41  allowRecurringJobWhileVolumeDetached: true
42  createDefaultDiskLabeledNodes: true
43  replicaAutoBalance: "best-effort"
44  taintToleration: "node-role.kubernetes.io/control-plane:NoSchedule;node-role.kubernetes.io/master:NoSchedule"
45  priorityClass: "high-priority"
46  nodeDownPodDeletionPolicy: "delete-both-statefulset-and-deployment-pod"
47  concurrentAutomaticEngineUpgradePerNodeLimit: "5"
48
49longhornManager:
50  tolerations:
51  - key: node-role.kubernetes.io/control-plane
52    operator: Exists
53    effect: NoSchedule
54  - key: node-role.kubernetes.io/master
55    operator: Exists
56    effect: NoSchedule
57longhornDriver:
58  tolerations:
59  - key: node-role.kubernetes.io/control-plane
60    operator: Exists
61    effect: NoSchedule
62  - key: node-role.kubernetes.io/master
63    operator: Exists
64    effect: NoSchedule
65
66longhornUI:
67  tolerations:
68  - key: node-role.kubernetes.io/control-plane
69    operator: Exists
70    effect: NoSchedule
71  - key: node-role.kubernetes.io/master
72    operator: Exists
73    effect: NoSchedule
74  nodeSelector:
75    node.longhorn.io/create-default-disk: "true"
76
77longhornConversionWebhook:
78  tolerations:
79  - key: node-role.kubernetes.io/control-plane
80    operator: Exists
81    effect: NoSchedule
82  - key: node-role.kubernetes.io/master
83    operator: Exists
84    effect: NoSchedule
85  nodeSelector:
86    node.longhorn.io/create-default-disk: "true"
87
88longhornAdmissionWebhook:
89  tolerations:
90  - key: node-role.kubernetes.io/control-plane
91    operator: Exists
92    effect: NoSchedule
93  - key: node-role.kubernetes.io/master
94    operator: Exists
95    effect: NoSchedule
96  nodeSelector:
97    node.longhorn.io/create-default-disk: "true"
98
99longhornRecoveryBackend:
100  tolerations:
101  - key: node-role.kubernetes.io/control-plane
102    operator: Exists
103    effect: NoSchedule
104  - key: node-role.kubernetes.io/master
105    operator: Exists
106    effect: NoSchedule
107  nodeSelector:
108    node.longhorn.io/create-default-disk: "true"
109
110enablePSP: false
111EOF
验证
1cat <<-EOF | kubectl apply -f -
2kind: PersistentVolumeClaim
3apiVersion: v1
4metadata:
5  name: rwo
6spec:
7  storageClassName: longhorn
8  accessModes:
9    - ReadWriteOnce
10  resources:
11    requests:
12      storage: 1Gi
13
14---
15kind: Pod
16apiVersion: v1
17metadata:
18  name: rwo
19spec:
20  containers:
21  - name: busybox
22    image: busybox
23    command:
24    - sleep
25    - "3600"
26    volumeMounts:
27    - name: rwo
28      mountPath: "/pv-data"
29      readOnly: false
30  volumes:
31  - name: rwo
32    persistentVolumeClaim:
33      claimName: rwo
34
35---
36kind: PersistentVolumeClaim
37apiVersion: v1
38metadata:
39  name: rwx
40spec:
41  storageClassName: longhorn
42  accessModes:
43    - ReadWriteMany
44  resources:
45    requests:
46      storage: 1Gi
47
48---
49kind: Pod
50apiVersion: v1
51metadata:
52  name: rwx
53spec:
54  containers:
55  - name: busybox
56    image: busybox
57    command:
58    - sleep
59    - "3600"
60    volumeMounts:
61    - name: rwx
62      mountPath: "/pv-data"
63      readOnly: false
64  volumes:
65  - name: rwx
66    persistentVolumeClaim:
67      claimName: rwx
68EOF
至此,我们姑且认为您已经按照上述步骤完成 LongHorn 的安装。
部署 Ingress Nginx 控制器
前面说过,我不打算使用 Loadbalancer,因为它的代价实在是太高了,但也不想让用户访问时多加一个端口,所以,准备使用 hostNetwork 参数暴露宿主机上的 80 和 443 端口,配合 pod 亲和性和反亲和性,将 Ingress Nginx 的 pod 固定在三个 master 节点上,再利用上述负载均衡让 Ingress 可以暴露在互联网。
1VERSION=4.7.1
2
3curl -L https://ghproxy.com/https://github.com/kubernetes/ingress-nginx/releases/download/helm-chart-${VERSION}/ingress-nginx-${VERSION}.tgz -o ~/.cache/helm/repository/ingress-nginx-${VERSION}.tgz
4
5cat << EOF | helm -n ingress-nginx upgrade -i ingress-nginx ~/.cache/helm/repository/ingress-nginx-${VERSION}.tgz --create-namespace -f -
6controller:
7  image:
8    registry: uhub.service.ucloud.cn/silkdo/registry.k8s.io
9    digest:
10    digestChroot:
11  config:
12  dnsPolicy: ClusterFirstWithHostNet
13  reportNodeInternalIp: true
14  watchIngressWithoutClass: true
15  hostNetwork: true
16  hostPort:
17    enabled: false
18    ports:
19      http: 80
20      https: 443
21  ingressClassResource:
22    default: true
23  publishService:
24    enabled: false
25  kind: Deployment
26  updateStrategy:
27    rollingUpdate:
28      maxSurge: 0
29      maxUnavailable: 1
30    type: RollingUpdate
31  tolerations:
32    - key: node-role.kubernetes.io/control-plane
33      operator: Exists
34      effect: NoSchedule
35    - key: node-role.kubernetes.io/master
36      operator: Exists
37      effect: NoSchedule
38  affinity:
39    nodeAffinity:
40      requiredDuringSchedulingIgnoredDuringExecution:
41        nodeSelectorTerms:
42        - matchExpressions:
43          - key: node-role.kubernetes.io/control-plane
44            operator: Exists
45  replicaCount: 3
46  service:
47    enabled: true
48  opentelemetry:
49    enabled: true
50    image: uhub.service.ucloud.cn/silkdo/registry.k8s.io/ingress-nginx/opentelemetry:v20230527
51    containerSecurityContext:
52      allowPrivilegeEscalation: false
53  admissionWebhooks:
54    enabled: true
55    patch:
56      enabled: true
57      image:
58        registry: uhub.service.ucloud.cn/silkdo/registry.k8s.io
59        digest:
60      tolerations:
61        - key: node-role.kubernetes.io/control-plane
62          operator: Exists
63          effect: NoSchedule
64        - key: node-role.kubernetes.io/master
65          operator: Exists
66          effect: NoSchedule
67      affinity:
68        nodeAffinity:
69          requiredDuringSchedulingIgnoredDuringExecution:
70            nodeSelectorTerms:
71            - matchExpressions:
72              - key: node-role.kubernetes.io/control-plane
73                operator: Exists
74defaultBackend:
75  enabled: true
76  name: defaultbackend
77  image:
78    registry: uhub.service.ucloud.cn/silkdo/registry.k8s.io
79    digest:
80  updateStrategy:
81    rollingUpdate:
82      maxSurge: 0
83      maxUnavailable: 1
84    type: RollingUpdate
85  tolerations:
86    - key: node-role.kubernetes.io/control-plane
87      operator: Exists
88      effect: NoSchedule
89    - key: node-role.kubernetes.io/master
90      operator: Exists
91      effect: NoSchedule
92  affinity:
93    nodeAffinity:
94      requiredDuringSchedulingIgnoredDuringExecution:
95        nodeSelectorTerms:
96        - matchExpressions:
97          - key: node-role.kubernetes.io/control-plane
98            operator: Exists
99    podAntiAffinity:
100      requiredDuringSchedulingIgnoredDuringExecution:
101      - labelSelector:
102          matchExpressions:
103          - key: app.kubernetes.io/component
104            operator: In
105            values:
106            - default-backend
107        topologyKey: kubernetes.io/hostname
108  replicaCount: 3
109EOF
部署 CertManager 控制器
单纯为了获取免费 SSL 证书
1VERSION=1.12.2
2
3curl -L https://charts.jetstack.io/charts/cert-manager-v${VERSION}.tgz -o ~/.cache/helm/repository/cert-manager-v${VERSION}.tgz
4
5cat <<-'EOF' | helm -n cert-manager upgrade -i cert-manager ~/.cache/helm/repository/cert-manager-v${VERSION}.tgz --create-namespace -f -
6installCRDs: true
7
8strategy:
9  type: RollingUpdate
10  rollingUpdate:
11    maxSurge: 0
12    maxUnavailable: 1
13
14image:
15  repository: uhub.service.ucloud.cn/silkdo/quay.io/jetstack/cert-manager-controller
16
17extraEnv:
18  TZ: Asia/Shanghai
19tolerations:
20- key: node-role.kubernetes.io/control-plane
21  operator: Exists
22  effect: NoSchedule
23- key: node-role.kubernetes.io/master
24  operator: Exists
25  effect: NoSchedule
26affinity:
27  nodeAffinity:
28    requiredDuringSchedulingIgnoredDuringExecution:
29      nodeSelectorTerms:
30      - matchExpressions:
31        - key: node-role.kubernetes.io/control-plane
32          operator: Exists
33
34prometheus:
35  enabled: true
36  servicemonitor:
37    enabled: true
38    endpointAdditionalProperties:
39      relabelings:
40      - replacement: base
41        targetLabel: group
42
43webhook:
44  image:
45    repository: uhub.service.ucloud.cn/silkdo/quay.io/jetstack/cert-manager-webhook
46
47cainjector:
48  image:
49    repository: uhub.service.ucloud.cn/silkdo/quay.io/jetstack/cert-manager-cainjector
50
51acmesolver:
52  image:
53    repository: uhub.service.ucloud.cn/silkdo/quay.io/jetstack/cert-manager-acmesolver
54
55startupapicheck:
56  image:
57    repository: uhub.service.ucloud.cn/silkdo/quay.io/jetstack/cert-manager-ctl
58EOF
部署 SafeLine
Helm 部署 SafeLine
1helm repo add jangrui https://github.com/jangrui/SafeLine --force-update
2helm -n safeline upgrade -i safeline jangrui/safeline --create-namespace
创建一个 HTTP01 类型的 ACME 发行者
1cat <<-'EOF' | kubectl apply -f -
2apiVersion: cert-manager.io/v1
3kind: Issuer
4metadata:
5  name: waf.silkdo.com
6  namespace: safeline
7spec:
8  acme:
9    email: admin@jangrui.com
10    server: https://acme-v02.api.letsencrypt.org/directory
11    privateKeySecretRef:
12      name: waf.silkdo.com.tls
13    solvers:
14    - http01:
15        ingress:
16          class: nginx
17EOF
创建 Ingress
1cat <<-'EOF' | kubectl apply -f -
2apiVersion: networking.k8s.io/v1
3kind: Ingress
4metadata:
5  name: waf.silkdo.com
6  namespace: safeline
7  annotations:
8    cert-manager.io/issuer: "waf.silkdo.com"
9    nginx.ingress.kubernetes.io/ssl-redirect: "true"
10    nginx.ingress.kubernetes.io/service-upstreamtrue: "true"
11    nginx.ingress.kubernetes.io/backend-protocol: "HTTPS"
12spec:
13  ingressClassName: nginx
14  rules:
15  - host: waf.silkdo.com
16    http:
17      paths:
18      - path: /
19        pathType: ImplementationSpecific
20        backend:
21          service:
22            name: safeline-mgt-api
23            port:
24              number: 1443
25  tls:
26  - hosts:
27    - waf.silkdo.com
28    secretName: waf.silkdo.com.tls
29EOF
此处省略 DNS 解析过程,默认认为您的域名已经做好 DNS 解析。
至此,您可以通过域名访问直接访问 SafeLine 的管理后台;另一种方法,也可以通过 NodePort 的形式去访问。
配置 WAF
既然 SafeLine 已经安装好了 ,那么把我们的域名交给 WAF 去防护肯定是首选了。
添加人机验证
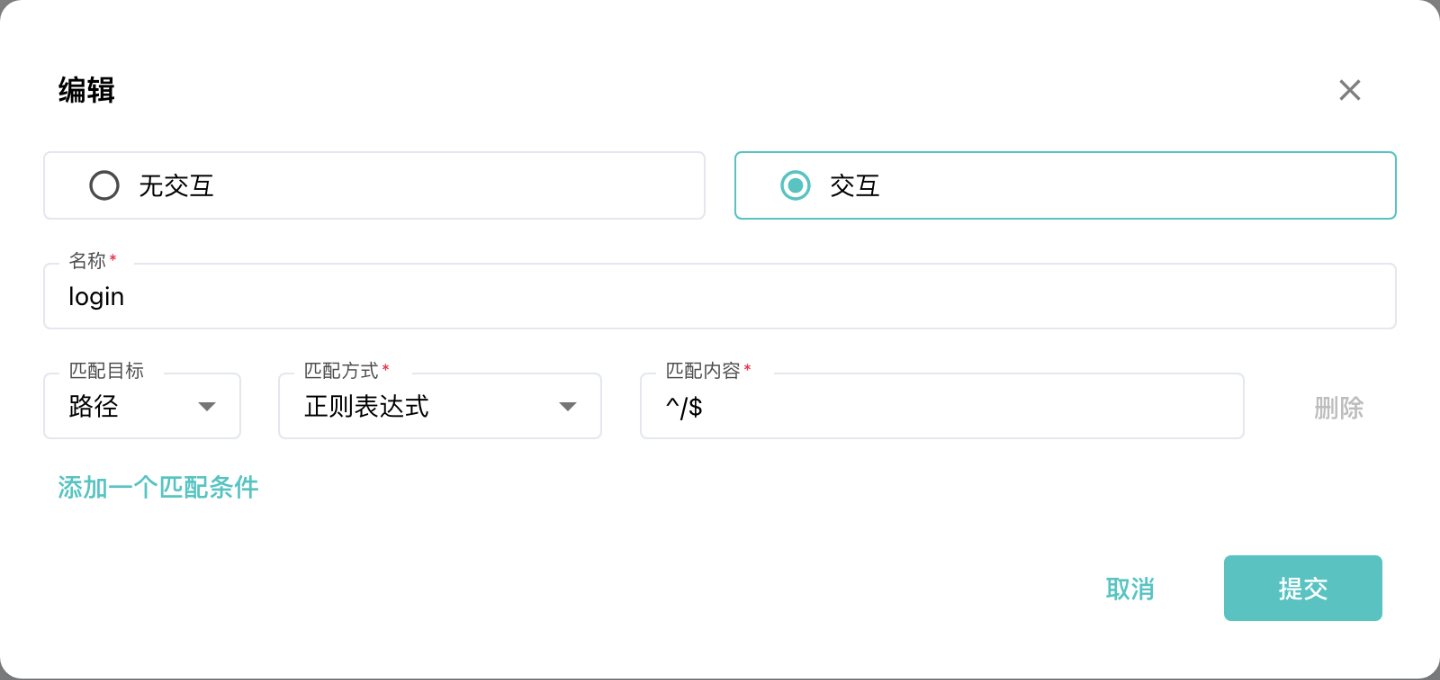
这里单纯为了一眼看出下面配置的网站是经过 WAF 防护的。
配置防护站点
我们这里直接把刚才的 waf.silkdo.com 作为要防护站点。

刚才我们已经给 SafeLine 添加了一个 Ingress,但后端 SVC 用的是 safeline-mgt-api,而现在,我们需要 Ingress 也经过 WAF 防护,此时只需要稍作修改,把 Ingress 的后端 SVC 改成 safeline-tengine 即可。
1cat <<-'EOF' | kubectl apply -f -
2apiVersion: networking.k8s.io/v1
3kind: Ingress
4metadata:
5  name: waf.silkdo.com
6  namespace: safeline
7  annotations:
8    cert-manager.io/issuer: "waf.silkdo.com"
9    nginx.ingress.kubernetes.io/ssl-redirect: "true"
10    nginx.ingress.kubernetes.io/service-upstreamtrue: "true"
11    nginx.ingress.kubernetes.io/backend-protocol: "HTTPS"
12spec:
13  ingressClassName: nginx
14  rules:
15  - host: waf.silkdo.com
16    http:
17      paths:
18      - path: /
19        pathType: ImplementationSpecific
20        backend:
21          service:
22            name: safeline-tengine
23            port:
24              number: 80
25  tls:
26  - hosts:
27    - waf.silkdo.com
28    secretName: waf.silkdo.com.tls
29EOF
别忘了 SVC 端口也需要跟着变动。

现在,打开一个无痕窗口,访问你的域名,出现上图,说明你的 WAF 成功生效,至此,Safeline 落地到云原生环境完结。

Lorna0
Updated 3 years ago
0
好内容放 issue 里容易被淹没,我们把仓库的 discussion 开了给师傅放到这边来。

junlintianxiazhifulinzhongguo
Updated 3 years ago
0
我参考这篇文章,部署safeline 已经成功,在配置防护站点后,访问报 502,请问教程是否还有没有记录到的配置
jangrui
Updated 3 years ago
最新版的 chart 包是 3.16.1,我测试是没有问题的。
可以提供日志看看

charnet1019
Updated 2 years ago
0
按这个配置代理waf自身是可以正常访问的,但代理其他命名空间下的web服务访问不了;
但通过将safeline-tengine设置为loadbalancer后再设置代理就可以访问了(我的ingress controller是通过loadbalancer配置的)
基本流程:
loadbalancer ---> safeline-tengine ---> backend service
但这样配置后等于没有和ingress配合使用,不知道你那边是否也是这种配置的?
jangrui
Updated 2 years ago
- 其他 ns 下的 ing 就没有用了,需要全转到 safeline ns 下。
1apiVersion: networking.k8s.io/v1
2kind: Ingress
3metadata:
4  annotations:
5    nginx.ingress.kubernetes.io/proxy-body-size: 4096m
6    nginx.ingress.kubernetes.io/service-upstreamtrue: "true"
7    nginx.ingress.kubernetes.io/ssl-redirect: "true"
8  name: xxx.xxx.xxx
9  namespace: safeline
10spec:
11  ingressClassName: nginx
12  rules:
13  - host: xxx.xxx.xxx
14    http:
15      paths:
16      - backend:
17          service:
18            name: safeline-tengine   # 所有 ns 中的 web 服务都可以让走 safeline namespace 中的 tengine 服务
19            port:
20              number: 80
21        path: /
22        pathType: Prefix
23  tls:
24  - hosts:
25    - xxx.xxx.xxx
26    secretName: sixxx.xxx.tls
- 配置其他 ns 下的上游服务器示例:https://harbor.harbor-system.svc.cluster.local:80
charnet1019
Updated 2 years ago
0
看了下官方文档,ingress controller通过安装safeline插件可以实现代理其他ns下域名,但这种方式有些功能是有限制无法使用的,如人机验证、身份认证
基本流程:
client -> lb -> ingress controller(安装有safeline插件) -> safeline-detector -> backend service
注意事项:
1# safeline.yaml
2apiVersion: v1
3kind: ConfigMap
4metadata:
5  name: safeline
6  namespace: ingress-nginx
7data:
8    host: "detector_host" # 雷池检测引擎的地址, 此处需要填写完整域名,否则会报错,如 safeline-detector.safeline.svc.cluster.local
9    port: "8000"
jangrui
Updated 2 years ago
我艹,你不说我都没注意到已经出 ingress-nginx 的插件了。
你可以试试全新安装集成方式
charnet1019
Updated 2 years ago
0
我已经测试过了,是可以代理其他ns下的ingress

boonhanchng
Updated 2 years ago
0
根据教程部署完之后,反代可以 从 域名到safeline-tengine 但是 人机验证 封锁 都无效,只有反代功能有生效
jangrui
Updated 2 years ago
我这边好着呢。
可以提供一些详细信息,研究研究。
boonhanchng
Updated 2 years ago
师傅您的 镜像仓库的镜像是不是和 docker io 的不一样?
之前因为 我在马来西亚拉取不到 您的 values里面的 仓库 我转向 docker io
今天我尝试一下 用values.yml里面的仓库拉取的,可以正常运行
jangrui
Updated 2 years ago
对,tengine 和 detector 这两个服务是定制镜像,也就是按照官文把 socket 方式改为 http,存放在个人仓库,其他镜像默认使用雷池官方华为镜像仓库 swr.cn-east-3.myhuaweicloud.com/chaitin-safeline

Jerry12228
Updated 2 years ago
0
emmm小白路过,请问我能否认为这个教程是自行构建雷池镜像的过程?(我正在尝试自行构建镜像)
jangrui
Updated 2 years ago
不是

rex7036
Updated 2 years ago
0
大佬,6.9.1版本无法上传证书,是不是也是因为tengine 和 detector 这两个服务是的镜像没有修改成http的原因,我用的是官方的镜像
rex7036
Updated 2 years ago
应该不是这个原因,改了你定制过的镜像之后还是有这个问题
jangrui
Updated 2 years ago
卸载后,保留数据库 pvc,把其余 pvc 删掉,重新部署一遍。
1helm -n safeline un safeline
2kubectl -n safeline get pvc -o custom-columns=NAME:.metadata.name | grep ^safeline | xargs -I {} kubectl -n safeline delete pvc {}
3
4helm repo add jangrui https://github.com/jangrui/SafeLine --force-update
5helm -n safeline upgrade -i safeline jangrui/safeline --create-namespace
如果遇到 safeline-tengine 缺少 error.log 而起不来,需要手动创建。例如:
1mkdir safeline-safeline-logs-pvc-2ca226e1-0d23-4fb5-aa35-d4cde11b8001/nginx
2kubectl -n safeline delete po -l component=tengine
jangrui
Updated 2 years ago
6.10.2+ 已修复